We had a super busy day yesterday in mid-Maryland. Evening plans and Father’s Day/my birthday on Sunday meant garden obligations had to be met in short order to allow festivities to be truly festive and to allow my neurotic soul to breathe easy and enjoy. So as soon as breakfast was done (a big honkin’ kale smoothie made into a parfait with overnight oats – cause that’s just how I roll), I grabbed the lawn mower and got a move on. The great thing about mowing around the garden is that it allows me to peek in and re-evaluate my plan of action. I had originally planned to leave my broccoli and cauliflower alone as I wasn’t convinced they were done. I had tomatoes to plant, preferably in the ground as my container tomatoes just don’t seem to do well. I had basil to pot and various other things to plant, water, weed all in time for my 25th high school reunion (gulp, that sounds like a long time ago).
I quickly discerned that most of the broc and cauliflower were either spent or not budding (with 100 degree heat in the forecast, it seemed like time to give up). I cleared those puppies out, planted a few new cucumbers and a tomato. Dug up my ornamental fennel that a dear friend sent me seeds for from her plant in Michigan (i had thought it was edible so put it in the veggie garden – that’s a big plant for no eating in the veggie garden, but lovely and so yum smelling). “Mom…. a snake!” Ran to children. Observed large rat snake leaving patio, down retaining wall into woods. Back to garden. In went the watermelon. Husband (pack mule) brought soil and compost to required location and did the part of the mowing that makes my knees go all wing-wangy. Soil and compost piled in sunny spot, tomato planted. Carrots pulled, beets pulled, raspberries picked (and eaten – who could resist?!). Dig, dig, dig, Hunh?
Turtle in garden. Shell completely closed. Husband transported turtle to patio for warming. Turtle slowly gained courage and eventually crawled away. Weeds removed, basil planted, zucchini checked for mildew. Japanese beetles on raspberry canes squished (without remorse). Garden haul gathered and taken to kitchen. Fresh carrot munched while removing leaves from 8 broc/cauliflower plants (rinse, wrap in cool wet and slip in plastic bag then fridge), beets same, carrots same. Second fridge full. Warmed leftover bulgur and added freshly harvested (raw) broccoli so it warmed and got the tiniest bit tender. Stirred in homemade Asian peanut sauce from container in fridge. Deeeeelish. Shower. Actually used a blowdryer – yes, a special occasion indeed. Met friends, dropped off kids.
Reunion. Such fun. Hugs. Fabulous old (and by that I mean young, vibrant, and absolutely wonderful) friends. Stories. Hugs. Dinner. Cake. Wine. Bed.
Just about perfect. Hope you are all enjoying a fabulous weekend.
Fabu Asian Peanut Sauce
Two large glops of peanut butter
A few shakes of soy or Bragg’s (to taste)
red chili flakes (or chili paste)
crushed garlic
minced/crushed/or powdered ginger
chopped cilantro
water
This is a wonderful sauce in that it is highly adaptable and easy to adjust for different tastes and uses. I usually don’t measure (shocker, I know), start with the PB, and add the other ingredients to taste (which means I get to eat it while I’m making it, which is obviously a good thing). Most of the ingredients are optional or could be changed out, but I find this combo to be the most yum. When I’ve mixed everything but the water to taste, I add enough water to make it suit my needs. If it’s a drizzling sauce I add more water. If I want to dip veggies in it, less water. It keeps beautifully and adds a lovely Asian peanut vibe to just about anything you might want to eat. Great on noodles, fabulous on broccoli…. especially broccoli you’ve just brought in from the garden.
We had some big doin’s here over the weekend, and while it may be a stretch to relate it all back to food, I’m going to take a leap of faith and write about the most interesting thing that’s happened recently and trust my powers of obsession to bring it back to how we eat. I can do it, at least I think I can, I think I can, I think I can…
So on Saturday morning I was the first to rise (unusual) and I quietly made my way downstairs hoping to steal a few moments alone before starting a batch of pancakes. I could already smell the cast iron warming in the oven. The dog joined me and I opened the back door (as usual) to let him take his morning constitutional. He took off like a shot, barking his head off. He returned quickly and demanded to be let in. As I opened the door to let him in, I saw the top of the head of a presumed stray dog making its way through the yard. I hustled my guy in, closed the door and attempted to get a better look. I didn’t have to work at it for long. The dog rounded the corner, came up on the patio, and sat down at the bird feeder that he had already dismantled and began to eat. This is apparently what black bears do. Yes, my stray dog was in fact a black bear. Being the coward and poor picture taker that I am, I quickly went upstairs to get my husband out of bed. We watched (and our children joined us) for about 40 minutes as this adolescent bear silently climbed, maneuvered, explored, and bent our bird feeders to his will so that he could have a breakfast feast of sunflower seeds. My husband opened the door a couple of times; the bear looked up but was largely unimpressed with us. When he had enough and was tired of wondering what we were doing, he got up, shambled off with a snort at us, walked across the yard, and climbed the fence into the woods.
After freaking out in a variety of ways and splashing our encounter all over Facebook, I called animal control and got educated on our local black bear population. We were instructed to get rid of bird feeders. Sunflower seeds are, according to my friend at the Frederick County Animal Control office, “crack” for bears. We had become the new dealer. And so we painstakingly removed the source of the bear’s delight from our patio (which made sense since we couldn’t hang anything on the poles he bent with no apparent effort). We swept up the remnants so he wouldn’t be attracted to the smell of them. We secured the grill just in case it had any remnant anything on it that he might be interested in. As we finished these tasks I heard some deer just outside the fence line, looked over to see them, and there was our giant friend, standing on his hind legs, checking on our progress. I hustled the children inside, ran to close the shed so he wouldn’t hang out and stay a while. We barely closed the back door before he climbed the fence again and returned to the patio only to find that his next meal had been removed. I felt a little sorry for him as he looked genuinely confused. I then realized I’d left the garden gate opened. We watched in horror as he made his way over there.
I have never been so glad that strawberry season is over. He looked around, but not apparently favoring broccoli, beets, celery, carrots, or pubescent cucumbers and beans, he snuffled , left the garden without so much as bending a leaf and climbed over the other fence, crossed the neighbor’s driveway and wandered off toward another part of our neighborhood. Wow.
I’m still a bit in awe. This was not an adult bear, but not a baby either. He was probably 200 pounds and had to have been over 5 feet when standing upright to see me over the fence in back. And yet he was so quiet, so calm, so steady, and so single minded. He wanted seeds; he would climb any fences in front of him to get to them. This giant creature, who may apparently walk 100 to 150 miles before he chooses a new territory, wanted to chow down on sunflower seeds. There’s something kind of amazing about that. So simple, so plain, so nourishing and so direct. I’m hungry, I need food, it needs to help me walk a long way and I don’t want to chase anything… So there you are.
Because I like to cook and I’m susceptible to a bit of food porn now and then, I have a great deal of fun looking at recipes and pictures of recipes, and descriptions of meals and how people made their version of those recipes, and it becomes easy to get lost in the hullaballoo that food can be (and that can be delightful). This bear looked like his Mom told him: “Just eat it. It’s good for you and we’ve got stuff to do.” I am reminded that feeding the hunger in a healthy way is as close as the pantry, the garden, or the fridge, and that often all I need to do by way of preparation is take out a handful, rinse something off, or pick the ripest one. I shall strive to remind myself to keep it simple at least part of the time. And in the meantime, a salute to our new friend with two sunflowery good dishes…
Bear-y Good Oats
2 c rolled oats
2 c almond milk (or whatever kind you like)
zest of one lemon
raw sunflower seeds
berries
Place oats, milk, and zest in bowl or jar overnight to soak (the lemon zest was Big Sis’ idea). In the morning, spoon out some of that deliciousness in a bowl and top with sunflower seeds and berries of your choosing. Bear-y Good!
1 c soaked sunflower seeds (soak them in water overnight and rinse well)
1/4 c water
1 T apple cider vinegar
juice from 1/2 to 1 lemon
1 small clove garlic
3/4 t salt
1 T chopped fresh dill (or herb of your choice)
The original recipe suggests rubbing the hulls off of the soaked sunflower seeds to ensure that the spread is more white than grey colored. I tried this for about a minute and found it tedious in the extreme. I decided instead to place the rinsed seeds on a paper towel and then place a second towel on top, rubbed a bit and then picked off the hulls that were identifiable. Not as thorough, but apparently it was enough. If you’re okay with grey, I’d suggest skipping the hull concern altogether. Place all ingredients but water and dill in food processor. Add one half of the water and process. Add more water (by a few drops or a glug at a time) as needed to achieve good blending and a smooth texture. This can take some time – just let the thing grind away. The longer you let it go, the smoother your spread will be. When you’ve achieved the texture you like, scrape into bowl and mix in your dill. Serve on bread or crackers. Bear-y delish.
I thought I could, I thought I could, I thought I could…
So I’ve never grown potatoes before. Why? I don’t know. Truth is I’ve not grown much in the way of root vegetables until the last few years. Sort of a basic mistrust of what may or may not be going on underground. I like to be able to watch the progress of the food as it grows and potatoes, carrots, beets simply don’t allow you to do that. Yeah, yeah I know. I can watch the part above ground. I’m sorry, but it’s just not the same. I’ve tried carrots with limited success and beets, which we like but don’t need a lot of at any given moment (the pink pee is interesting to my daughter about once every few weeks, then loses its power to increase vegetable consumption). But I’ve never tried to grow the mighty spud. Which is silly, really, because I love potatoes. I mean I really love potatoes. Early in our relationship my husband and I figured out that he had grown up in a rice household and I had, as you might have guessed, grew up in a potato household. Over the years, despite our initial misgivings, we have both come to appreciate the other’s position, but I think I have really won the day. Homemade french fries will do that for you. Yeah, it’s a dirty trick, but somebody has to do it.
Where was I? Right, growing potatoes, so I’m happily clicking away on Pinterest and I come across this:
What’s that you say? THAT is a potato tower. You heard me right, a potato tower. Grow potatoes without using up all of your precious garden space. Okay, so that idea and the fact that I had 2×2 chicken wire that proved too big to keep rabbits out waiting in the shed convinced me to give it a go. So I asked my sweetie to pound some stakes in (our street has the word slate in the name, so guess what’s just an couple of inches below the surface) and then we made a round with the discarded chicken wire, securing the back bit by stapling it to the fence. I was determined NOT to buy new materials for this project because while I am optimistic, I am CHEAP and if it doesn’t work I’d hate to have spent a lot of dough. I then filled it around the edges with leaves, rather than the recommended straw and supplemented with a little spanghum moss that I had from another project since I thought it might help retain a little moisture. In the center, compost baby. Inserted my cut up seed potatoes in layers and filled with compost and leaves until we got about to the top. Here it is:
Will it work? I have NO idea. I’m sure I didn’t follow the directions exactly as that’s how I roll. While it is my belief that all gardening is an act of supreme optimism, the slapdash version that I usually do is strictly for the glass half-full crowd. If it does, that’s about 25 lbs of delicious potato magic coming our way. And if my children have their way, a great many of them will be prepared this way:
Awesome Oven Fries Adapted from the Weight Watchers New Complete Cookbook
1.25 lbs potatoes, peeled (if you must) and cut to 1/2″ fry shapes
3/4 to 1t salt
1/2t sugar
4t oil
1t paprika
1/4t pepper (I use white to avoid kid detection)
Preheat oven to 450. Lightly grease baking sheets or line with parchment paper (works better). Combine potatoes, 1/4t salt, sugar and cold water to cover. Soak 15 minutes, drain &blot dry. In dry bowl, combine potatoes with oil, paprika and pepper. Arrange in single layer on baking sheet. Bake, turning as they brown. 35-45 minutes. Sprinkle with salt. Voila. Fan-flipping tastic. Yes, you should probably make a double batch.
One of the glories of spring – watching those little green bits poke out of the soil, transforming from a hard little pebble into something that may well be able to feed you. Miraculous. Especially when it works. In the past I have not had good luck with starting from seed and it took lots of reading for me to realize that I am not alone. Most gardening guides tell you right off the bat that starting from seed, while potentially rewarding and money-saving, can be very frustrating. In the past I have started seeds, used the few plants that worked out, and bought seedlings for the rest. I have, however, made minor adjustments over the years and for the first time – and I am reluctant to say anything and jinx the outcome – I seem to be growing several plants that might actually survive this process. So I thought I’d share what I’ve learned with you while there’s still time – especially for those of you to the north. Frankly with the way the weather has been, I’m inclined to dispense with my normal planting calendar altogether and just start whatever I want whenever it occurs to me.
For me, seedling success seems to depend most on 4 variables.
1) Temperature. For the last two years I have used heat with my seedlings and it has made an enormous difference in the number of seeds that germinate and the amount of time that it takes for them to start. I personally use a heating pad (which I imagine is NOT recommended by heating pad manufacturers and is certainly NOT recommended by seed heater manufacturers 😉 ) and if it is especially chilly I also put a space heater next to the seedling rack. My understanding is that most seeds need at least 70 degrees to germinate. I feel the trays and if they are mildly warm NOT HOT I go with that.
2) Moisture. Seeds need water to germinate. Seed starting trays often include a plastic dome for cover and this helps retain moisture and heat, makes a nice little hothouse to help your seeds along. I use these domes, but have found that the trick is to make sure not to keep the dome over seedlings that have emerged. The infant seedlings still want moisture, but not as much as seeds, and they don’t especially like a lot of water from the top. I’ve been careful this year to remove seedlings that have emerged from the germination tray once they are truly out of the soil and placed them in a tray that is not covered to keep them from constantly being rained on from the plastic dome. Because I like to be able to move them easily I prefer cardboard cells or toilet paper rolls cut in half to plant in rather than the rows of plastic cells.
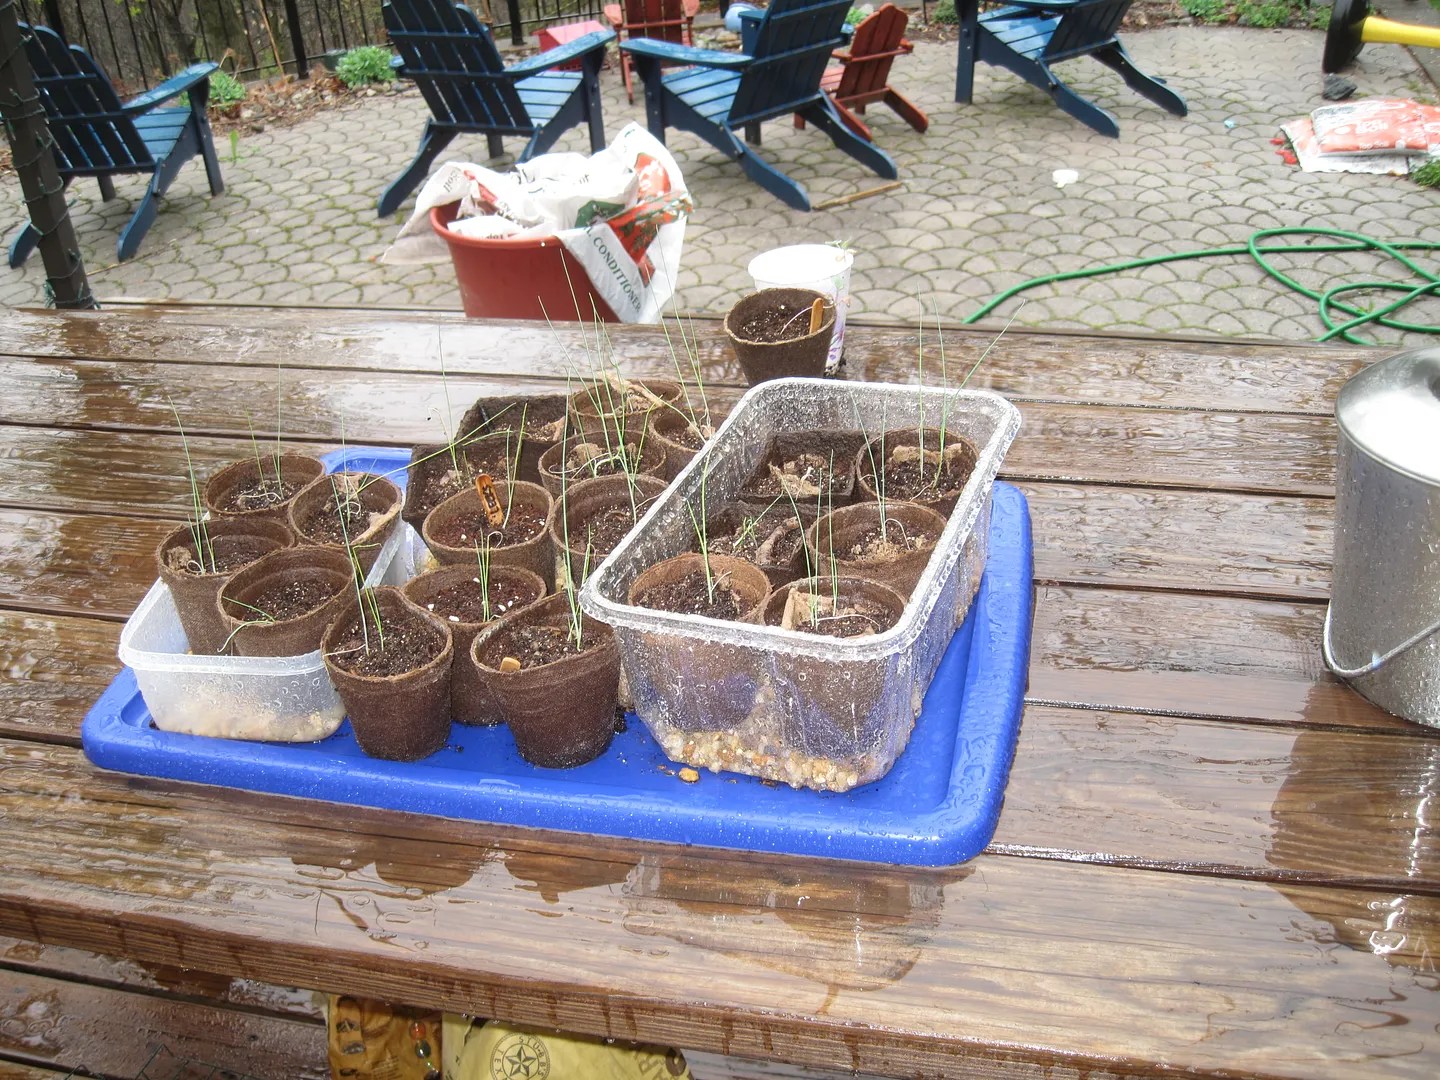
I’ve tried something new this year that has proven quite effective in helping me regulate moisture levels for my seedlings. Pea gravel. Pardon the blurry image – what I’m trying to show is the gravel in the middle of the seed tray here. I scooped some pea gravel into the bottom of the tray and then placed the seed starting cups on top of the gravel. This allows me to pour water UNDER the seed starting cups. They drink it up from the bottom while sitting on the gravel; they are not as likely to develop problems associated with over-watering or water overwhelming the seedlings. The pea gravel also holds onto a bit of moisture and slowly delivers some moisture to the plants through contact. If I am remiss in watering, the effect does not seem to be as devastating. If I overwater (something I tend to do), the damage seems mitigated. I will be using pea gravel again. It is important to note that I DO have a plastic tray under all of this mess that I tested for holes. A drippy seed starting tray is not fun, and can be crazy dangerous if you follow my next suggestion…
3) Light. In years past I simply set up some shelves in front of a sliding glass door that was as south-easterly as I could provide and had very sad looking little seedlings. Pale, leggy to the point of collapse. NO GOOD. I did some research online and found that there were plenty of gadgets available to help me provide light to me little veggie children and all I had to do was plunk down a load of cash and I too could experience seed starting victory. Well, I pretty much vow not to start from seed every year, so the investment that they were asking for was pretty much out of the question. More research from the DIY pages revealed that florescent shoplites can deliver adequate seedling sun. That sealed it. I had a wire shelf unit already (scored from a big box store on super sale, so I think it was like $15). I went to the hardware store. An employee offered to help and I explained my dismay that I couldn’t seem to get enough light in a VERY SUNNY glass door. He expressed a theory that newer windows and glass doors may block out some of the magic that seedlings require because of their coatings and insulation. He said something along the lines of “I’m no scientist, but folks with old windows seem to have better luck no matter which direction they’re facing.” He then helped me choose 4 foot shoplites and T-12 bulbs. I rigged the lights, added a heating pad, threw on a full spectrum light I had from when I lived somewhere it rained ALL THE TIME and voila, instant sunny spot for seedlings.
Lights Off.
Let the sunshine on.
4) Transplanting. Great, so you’ve got some healthy green little buggers in those cells and it is so exciting so you just wait until the right date, right? No. You will need to take them out of those little jobbies and put them in slightly larger containers to allow their roots room to grow. Yes, you really need to do this. I usually do it when the seedling has begun to develop it’s second set of leaves. This is another time I am glad to use cardboard. It is MUCH easier to get them out of the cardboard then plastic, in my experience. So, gently move them into larger containers, and a week before the proper date for outside I start putting them outside for a few hours a day, slowly building up the amount of time to get them accustomed to the harsher conditions that may be out there waiting for them.
Leeks getting ready for the garden. Go, leeks, go – you expensive, delicious little freaks!
I’ll keep you posted as to how many of my little beauties actually make it into the soil. Here’s hoping my experiments will pay off for you!
Want to grow celery and romaine in your garden? Well, hopefully this experiment will prove successful and we’ll all be able to do that more easily and quickly. The above is the end of a celery stalk clump (I’m sure there is a better botanical term than that!), and the end of a bunch of romaine sitting in about 1/2 inch of water in a sunny window sill.
1-2 weeks later of pouring a little more water in the bowl every day or two….
The outside of the celery stalk clump is definitely rotting a little, but hey – there’s little baby leaves coming out of there! So finally, today I took the last step….
the celery, and…..
the romaine. I’ll keep you posted on the progress now that they are in the ground. Seems like a pretty cool way to cut my costs at least in half for celery and romaine, although technically I could make a new start from this start and they told 2 friends and so on, and so on.
This is especially magical because celery is in the top 3 kinds of produce (along with strawberries and apples) that retain the most pesticide residue. Nasty, nasty pesticide residue, mostly organo-phosphates that can mess with nervous systems, especially of little people with developing nervous systems. If you’d like to read more about the produce that does (and doesn’t) retain pesticide, check out Environmental Working Group’s list of the Dirty Dozen and the Clean Fifteen @ http://www.ewg.org/foodnews/

 We had a super busy day yesterday in mid-Maryland. Evening plans and Father’s Day/my birthday on Sunday meant garden obligations had to be met in short order to allow festivities to be truly festive and to allow my neurotic soul to breathe easy and enjoy. So as soon as breakfast was done (a big honkin’ kale smoothie made into a parfait with overnight oats – cause that’s just how I roll), I grabbed the lawn mower and got a move on. The great thing about mowing around the garden is that it allows me to peek in and re-evaluate my plan of action. I had originally planned to leave my broccoli and cauliflower alone as I wasn’t convinced they were done. I had tomatoes to plant, preferably in the ground as my container tomatoes just don’t seem to do well. I had basil to pot and various other things to plant, water, weed all in time for my 25th high school reunion (gulp, that sounds like a long time ago).
 I quickly discerned that most of the broc and cauliflower were either spent or not budding (with 100 degree heat in the forecast, it seemed like time to give up). I cleared those puppies out, planted a few new cucumbers and a tomato. Dug up my ornamental fennel that a dear friend sent me seeds for from her plant in Michigan (i had thought it was edible so put it in the veggie garden – that’s a big plant for no eating in the veggie garden, but lovely and so yum smelling). “Mom…. a snake!” Ran to children. Observed large rat snake leaving patio, down retaining wall into woods. Back to garden. In went the watermelon. Husband (pack mule) brought soil and compost to required location and did the part of the mowing that makes my knees go all wing-wangy. Soil and compost piled in sunny spot, tomato planted. Carrots pulled, beets pulled, raspberries picked (and eaten – who could resist?!). Dig, dig, dig, Hunh?
 Turtle in garden. Shell completely closed. Husband transported turtle to patio for warming. Turtle slowly gained courage and eventually crawled away.
 Weeds removed, basil planted, zucchini checked for mildew. Japanese beetles on raspberry canes squished (without remorse). Garden haul gathered and taken to kitchen. Fresh carrot munched while removing leaves from 8 broc/cauliflower plants (rinse, wrap in cool wet and slip in plastic bag then fridge), beets same, carrots same. Second fridge full. Warmed leftover bulgur and added freshly harvested (raw) broccoli so it warmed and got the tiniest bit tender. Stirred in homemade Asian peanut sauce from container in fridge. Deeeeelish. Shower. Actually used a blowdryer – yes, a special occasion indeed. Met friends, dropped off kids.
 Being the coward and poor picture taker that I am, I quickly went upstairs to get my husband out of bed.
  We watched (and our children joined us) for about 40 minutes as this adolescent bear silently climbed, maneuvered, explored, and bent our bird feeders to his will so that he could have a breakfast feast of sunflower seeds.
 My husband opened the door a couple of times; the bear looked up but was largely unimpressed with us. When he had enough and was tired of wondering what we were doing, he got up, shambled off with a snort at us, walked across the yard, and climbed the fence into the woods.


 I’m trying to show is the gravel in the middle of the seed tray here. I scooped some pea gravel into the bottom of the tray and then placed the seed starting cups on top of the gravel. This allows me to pour water UNDER the seed starting cups. They drink it up from the bottom while sitting on the gravel; they are not as likely to develop problems associated with over-watering or water overwhelming the seedlings. The pea gravel also holds onto a bit of moisture and slowly delivers some moisture to the plants through contact. If I am remiss in watering, the effect does not seem to be as devastating. If I overwater (something I tend to do), the damage seems mitigated. I will be using pea gravel again. It is important to note that I DO have a plastic tray under all of this mess that I tested for holes. A drippy seed starting tray is not fun, and can be crazy dangerous if you follow my next suggestion…